
APPEARANCE TIPS
QUICK COLOR CHANGES
The Top Color and Bottom Color options will work to color your layers if there is no Fill Color Layer or Stroke Color Layer layer selected! When you start a new Vigoro Composition, the top color will be set to white, and the bottom to blue. Layers will fade between these two colors, so you can get a lot of variation by just playing with these!
CUSTOM COLOR LAYERS
By changing the Fill Color Layer or Stroke Color Layer to a layer within your composition, you can create some really cool looks very easily. By default a 'Fill Color' and 'Stroke Color' layer are included, but you can change these to whatever you'd like. You can also change the effects applied to these layers, so don't think you're limited to the 4 Color Gradient pre-applied! You can even use an image, video or precomp to color your layers, so you can get some amazing palettes very quickly.
Note: If you want to add an image or video layer but it's too small/large for your composition, you'll need to make a composition that's the same size as your Vigoro Composition and scale the image within that. This makes sure that the image fills the scene properly for color sampling!
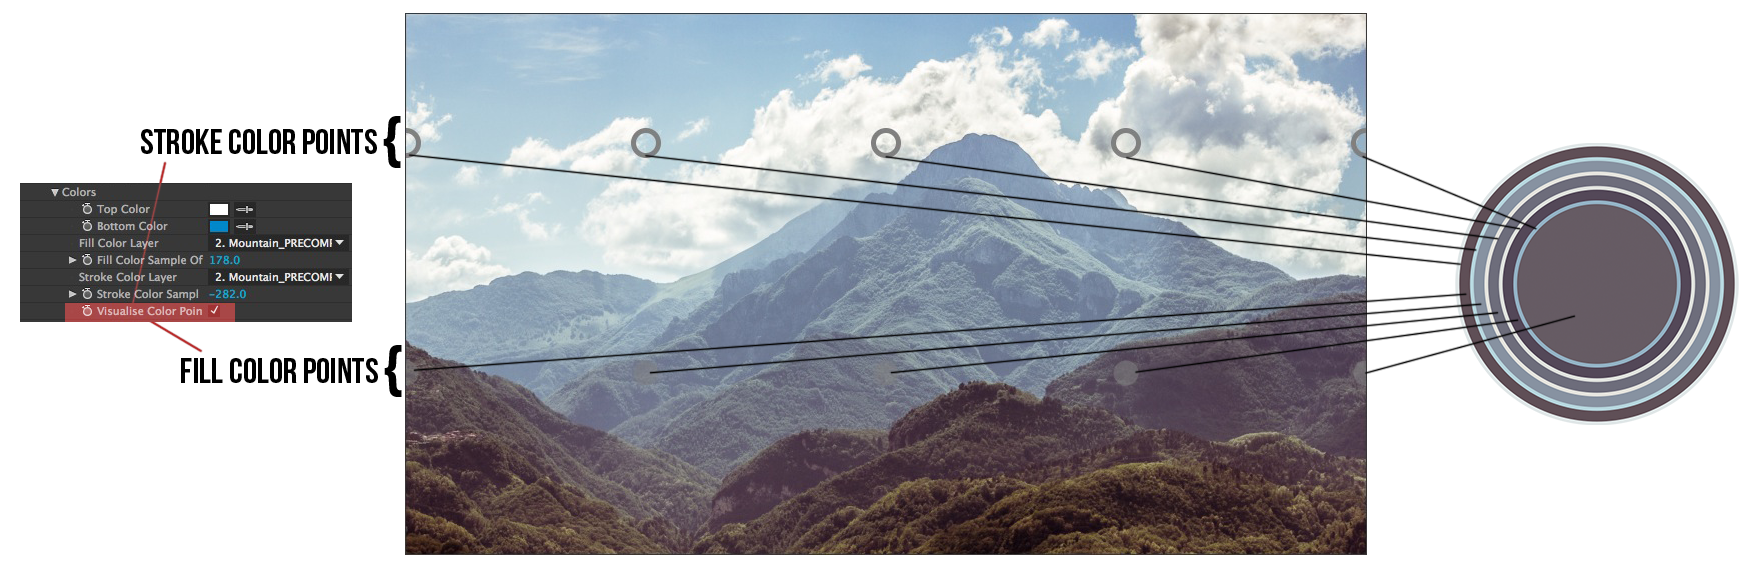
The Visualise Color Points checkbox will overlay some points onto your layer so you can see where exactly the colours are being sampled from.
rundown of Appearance options!
Fill: Turn layer fills on/off.
Fill Opacity: Lets you adjust the opacity of the layer Fill without affecting the stroke.
Stroke: Turns layer strokes on/off.
Stroke Opacity: Lets you adjust the opacity of the layer Stroke without affecting the fill.
Stroke Thickness: Controls the thickness of the stroke on the layers.
Stroke Dash: Adds a dash to the stroke - drag it up to make the dash bigger!
Dash Offset: Offsets the Dash of the stroke along the layer - this is separate from other cut etc. offsets.
Fade on Scale: When ticked, each layer will take on the same opacity as the scale in the Animation layer - so the lower their scale, the lower their opacity!
COLORS
Top Color: When the Fill/Stroke Color Layer is set to 'Controller', this sets the color of the top of the stack of the Vigoro layers. It will gradiate to the 'Bottom Color' color. It can be overridden by selecting a layer for the 'Fill Color Layer' or 'Stroke Color Layer'.
Bottom Color: When the Fill/Stroke Color Layer is set to 'Controller', this sets the color of the bottom of the stack of the Vigoro layers. It will gradiate to the 'Top Color' color. It can be overridden by selecting a layer for the 'Fill Color Layer' or 'Stroke Color Layer'.
Fill Color Layer: Here you choose the layer you want to control the Fill of your Circles. It will read the layer right to left, with the right colour being the top layer! When you load the script, you should set this first before you begin.
Fill Color Sample Offset: This will offset the y axis sample of the layer you have chosen to use for your fill. By default colours will be taken from directly across the center of the layer you've chosen!
Stroke Color Layer: Here you choose the layer you want to control the Stroke of your Circles. It will read the layer right to left, with the right colour being the top layer! When you load the script, you should set this first before you begin.
Stroke Color Sample Offset: This will offset the y axis sample of the layer you have chosen to use for your stroke. By default colours will be taken from directly across the center of the layer you've chosen!
Visualise Color Points: Checking this will overlay some circles across your screen. These represent where your fill/stroke is being sampled from if you're using custom color layers. The colors are sampled from right to left - so the top layer will be the right hand side of the screen!

